
")
19 Steps to Efficient African Catfish Breeding
Many farmers have been unable to successfully breed African Catfish. Several attempts made have given unfruitful results. In this guide, we have simple 19 proven steps to efficiently breed the African Catfish.

 Learn More
Due to the difficulties of getting consistent, fast growing, disease resistant and uniform sized catfish fingerlings and juveniles, the African Catfish Hatchery came into existence.

In the African Catfish Hatchery, catfish fry “come out” from eggs under an artificial condition in commercial numbers. These fry grow into fingerlings and they later become juveniles.
The past practice of capturing African catfish fingerlings or juveniles from the wild often encouraged disease infested stocks and the supplies of the fingerlings in large numbers from the wild are not always consistent.
This practice has never been commercially reasonable since the man hours expended in capturing the fishes are not commensurate with the fishes caught.
The African catfish breeding season in the wild usually commences with the advent of the rains. The coming of the rains in tropical Africa is mainly characterised with extreme temperature fluctuations. These fluctuations could prevent high survival of the African catfish fry.
The African Catfish
In addition to these limiting factors for securing viable and good catfish seeds, African catfish fingerlings caught from the wild could have in one way or the other experienced stunted growth due to lack of readily available good food.
Runoff water from rainfall at times introduces polluted water into streams and rivers that house these fry and fingerlings.
The African Catfish Hatchery therefore became pertinent to strategically address these shortcomings in the African catfish seed procurement.
Fry need consistent good food provided in sufficient quantities at regular intervals for smooth transitional growth.
Water quality is equally important.
Pollution of water in the wild at certain instances cannot be easily prevented.
This guide focuses on a simple method of producing African catfish seeds.
The aim is to remove the myth and mystery from African Catfish Seed production.
A lot of uncertainties have been credited to the propagation of the African catfish. I want to believe that this is probably due to inadequate knowledge of the fish.
Steps of propagation
Theses steps are by no means fixed. In fact new ideas are emerging constantly.
The African catfish could be propagated in several ways. These ways are basic, though dynamic.
Step 1: Identify and separate the sexes
The male and female of the African catfish can be easily recognised. The male has a distinct sexual papilla, elongated and located just behind the anus. This sexual papilla is usually red at the tip for sexually ready males. It is absent in females.
A gentle press on the belly of the female fish towards the genital opening releases the ripe eggs indicating the readiness and viability of the female.
A sexually ready female has a swollen, usually reddish genital opening. A view from the top also gives a female African catfish away since either side of the belly appears swollen.
Step 2: Select and check for a gravid female (ie female with ripe eggs)
Step 3: Weigh the female fish
gravid female catfish on a table scale.
Dried African Catfish pituitary gland
Dried pituitary inside a laboratory mortar.
Put the pituitary inside a laboratory mortar.
Ground items in a pestle
Grind the pituitary using a pestle until it becomes powder.
Saline solution added to a pestle
Add 1ml saline solution.
syringe containing solution
Collect the solution and Inject the female fish using an hypodermic syringe.
Ovaprim, an example of a synthetic hormone.
This is done to have an idea of the weight of the egg inside the fish. From my own experience, I can guess that 8 -15 percent of the weight of a gravid female fish is the weight of the eggs.
A female catfish that therefore weighs 500 grams has the weight of the egg to be 50 grams.
A gram of egg contains approximately 700 eggs.
Thus a gravid female African catfish with a weight of 500 grams could boast of 35,000 eggs.
The viability of the eggs depends on brood stock care and management.
Step 4: Prepare the female catfish for injection
African catfish pituitary is commonly used for induced catfish breeding. Methods of removal and preservation of the pituitary are not contained in this book.
For induced breeding of the African catfish, I like to the use the pituitary gland, either freshly removed or ethanol preserved. I recommend a ratio of 1:1, recipient: donor ie if the weight of the female fish to be induced is 1kg, the weight of the donor fish, male or female should also be 1kg for freshly removed pituitary.
However, for dried, preserved pituitary, I recommend a ratio of 1:1.5 ie recipient fish should be 1kg and the donor fish should weigh 1.5kg. I will like to state here that it is not compulsory that the donor fish should be one fish; it could be 2 or 3 fishes with a combined weight of 1.5kg or as the case may be in weight.
A synthetic hormone can also be used. Usually, the manufacturer will include the prescribed dosage suitable for the African catfish breeding.
When you want to inject the fish, please don’t inject the fish on the lateral line. I personally prefer the syringe pointing towards the tail of the fish. The fish should also be injected above the lateral line with the needle at 45 degrees to body of the fish.
Note that this process should be done while the fish’s head is covered with a moist towel. This allows the fish to remain calm throughout the entire process.
Step 5: Isolate the injected fish in a comfortable, big bowl and wait for 10 to 12 hours

Step 6: Prepare to strip the fish, set up your incubator
ATTENTION: Click “HERE” to receive More updates directly on your WhatsApp!
Step 7: Bring the fish out after 10 to 12 hours gently and cover the head with a clean, moist towel
Step 8: Wipe the body of the fish dry using a dry, soft towel
Step 9: Strip the fish (ie press the eggs out of the fish)
The pituitary injection makes the fish ready to release the eggs. In fact after the injection has been administered to the fish, following the right dosage, the process of getting the eggs out of the fish is irreversible.
At the onset of blood coming out with the eggs, please stop the exercise!
Step 10: Weigh the stripped eggs
This helps to have an idea of the expected fry.
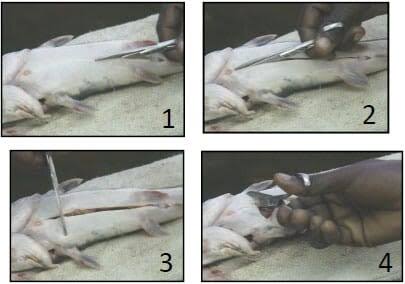
Step 11: Bring the male out, kill it, turn the belly up and cut it open
READ ALSO: Tilapia Hatchery Management and Fingerling Production
Step 12: Remove the milt sac
Step 13: Cut the testicles into bits to release the sperm
Step 14: Add saline solution to the milt
Step 15: Pour the mixture of saline solution and milt to the stripped eggs in the bowl
Step 16: Mix thoroughly and add fresh, clean, water
The saline solution added to the milt (sperm) keeps the sperm alive but not active. The saline solution makes it easy for the entire stripped eggs to be saturated with the milt. The subsequent addition of fresh, clean water now makes the sperm active and motile.
It is the addition of clean water that initiates the external fertilisation process. This whole process of fertilisation lasts for only about 60 seconds. That is why I strongly advice that you increase percentage fertilisation by stirring the mixture during this 60 seconds.
READ ALSO: Ammonia Management and Productivity in Fish Ponds
Step 17: Spread the eggs inside the incubator on the spawning sponge
Incubator set-up for African catfish
The spawning sponge is completely immersed in water. It however sits on the spawning net which keeps it suspended in the water. The net is held in place by pegs.
Step 18: Wait 20 to 36 hours
After 20 to 36 hours, remove the sponge and spawning net. By now the fry would have emerged from the hatched eggs and would have gone to the bottom of the net.
The un-hatched ones, now attached to the spawning sponge and spawning net are removed from the water since they would be attacked by fungi if left for too long. This fungi would inevitably attack the hatched eggs at the bottom of the net.
ATTENTION: Click “HERE” to receive More updates directly on your WhatsApp!
Step 19: Observe the newly hatched eggs, with yolk still visible and attached to the fry
Contributed By Lanre Ogunsina
-Advertisement-
 We do everything possible to supply quality information for farmers day in, day out and we are committed to keep doing this.
Your kind donation will help our continuous research efforts.
We do everything possible to supply quality information for farmers day in, day out and we are committed to keep doing this.
Your kind donation will help our continuous research efforts.


